- /
- /
Accessing the Horizon Client Emergency Pool
VMware Horizon Client
In the Windows Search menu, please type “VMware Horizon Client

It will ask you for the connection server which is called “vdi.rivier.edu”

Please type in your Rivier Credentials (please exclude “@rivier.edu”)
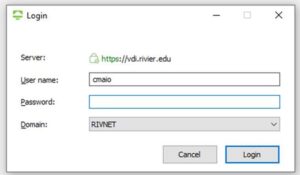
Locate and open the “Horizon Client Emergency Pool”

Once signed in, the environment you are accessing will look different from your regular environment until OneDrive syncs. This may take a few minutes to do so.
Applications:
Specific applications will be located in an easy to access folder labeled “Rivier Special Software”. Here is the list of applications in there:
- AssetKeeper
- CAMS in EDGE
- CAMS in RDS (Preferred CAMS application)
- Department Drives
- Employee Printers
- File Explorer
- Google Chrome
- GP2018
- GP Integration Manager
- GP Report Designer.rdp
- GP Report Viewer
- GP Run Integration
- PowerFAIDS
- Reports Drive
- Student Printers
Drives:
To access specific Department folders, please open the “Department Drives” folder:
![]()
In there, you will find the folders you have permissions for to easily access them. If you want even easier access, please right click the folder you want to access and click “Pin to Quick Access”.
To access specific Reports, please open the “Reports Drive” folder:
![]()
In there, you will find the folders you have permissions for to easily access them. If you want even easier access, please right click the folder you want to access and click “Pin to Quick Access”.
If there are specific Teams channels you need to access, please open Teams. In Teams, navigate to the team you are trying to access files for. Open the Files tab and click the “Sync” button to add that specific folder to your desktop. Depending on the number of files, this may take some time.
Printers:
To map your printers, please open the “Employee Printers” folder:
![]()
In there, you will find most, if not all, the printers you will need. Simply double-click the one you want to map to your new desktop and wait for it to connect.
Some printers may not be in the Employee Printers folder. This is usually due to them being accessible by students as well. Some library printers are in the “Student Printers” Folder:
![]()
Email:
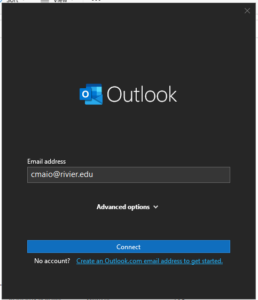
To access your email, you will want to first find Outlook via the search box by searching “Outlook”:

Once it is open, it will display your email in the “Email Address” box. If it does not, please fill in your Rivier email address:
Once you click connect, you will get a box that looks similar to this. Before clicking done, please uncheck the “Set up Outlook Mobile on my phone, too” box.

If you need to add another email, please see the next section:
Once you’ve fully opened Outlook, please allow your email to download from the cloud. Depending on how many emails you have, this could take some time.
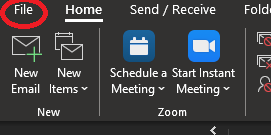
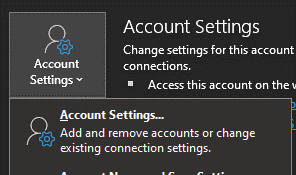
If you need to add a shared Mailbox, please navigate to File > Account Settings > Account Settings > Double-click on your email > More Settings > Advanced > “Add…” > Type in the full email address > Click “OK” > Click Apply.
![]()


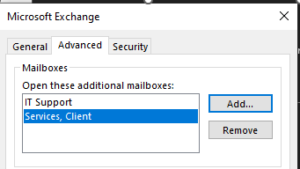
Please allow that time to sync from the cloud as well.
Bookmarks:
For now, the only bookmarks that will be migrated over will be the ones stored in Microsoft Edge IF they are synced with your Rivier Account. To sync these, please open Edge and click “Sync my Data”. Any shortcuts stored in Google Chrome will not be moved over.
USB devices
Any external USB devices will need to be activated via this menu:
